Resin crafting looks intimidating until you realize it's essentially controlled chemistry. You mix two parts together, pour them into a mold, and let chemistry do the work. The materials seem simple, but starting right saves you frustration, money, and failed batches. For more on safe handling, the Consumer Product Safety Commission has general safety guidelines for craft materials. The EPA's indoor air quality resources explain why ventilation matters when working with any chemical compounds.
I've mixed epoxy for years in different contexts, so when I moved into decorative resin work, I already understood the material. What surprised me was how much people overcomplicate it. You don't need ten specialized tools. You need the right ones, used properly.
Which Type of Resin Should You Start With?
Epoxy resin and UV resin are the two main types. They're fundamentally different and suited to different projects.
Epoxy resin is a two-part system. You mix resin and hardener in specific ratios, and a chemical reaction happens over hours. It's forgiving for beginners because you have time to work. You pour your pieces, add embellishments, and let them cure. The downside is cure time. Most epoxy takes 24 hours to fully harden.
UV resin is single-part. You pour it into a mold, expose it to UV light, and it hardens in minutes. The advantage is speed. The disadvantages are price (more expensive), equipment cost (you need a UV lamp), and less forgiving (once you expose it to UV, chemistry starts immediately).
For absolute beginners, epoxy resin is the better choice. It's cheaper, requires no special equipment beyond what you probably have, and gives you time to correct mistakes. UV resin is great once you understand the basics.
Some people start with clear epoxy, some with pigmented. Clear teaches you the fundamentals. Pigmented hides mistakes but is less educational. I'd recommend clear for learning, then moving to whatever you enjoy.
Explore our resin and epoxy craft supplies for everything you need to get started.
Buy from reputable resin suppliers. Cheap resin often has quality issues. It yellows, cures poorly, or doesn't mix properly. You'll waste materials and time. Good resin isn't expensive, just don't buy the absolute cheapest option.
Test your resin before starting your big project. Mix a small batch, pour it into a test mold, and see how it behaves. Different brands cure at different speeds and have different working times. You need to know what you're working with.
What Molds Do You Need and Why Does Choice Matter?
Silicone molds are the standard. They're flexible, reusable, and let you demold finished pieces without damage. Rubber or silicone molds come in countless shapes.
For jewelry, you'll want small silicone molds. Pendant molds, bezel molds, and cavity molds give you endless options. A beginner's assortment of 10-15 basic molds covers most projects.
Reusable plastic molds exist but silicone is better. Plastic can warp from the heat of curing resin. Silicone handles temperature better.
Some people make their own molds from metal or plastic containers. This is advanced and not where you start. Buy molds.
Storage matters. Molds can attract dust and debris. Store them in a clean container, covered, away from direct sunlight. Clean molds between uses with soap and water if any residue builds up.
Find quality molds in our resin craft supplies collection.
You don't need a huge mold collection to start. Five to ten diverse shapes teach you technique. As you get more experienced, you'll know what you need.
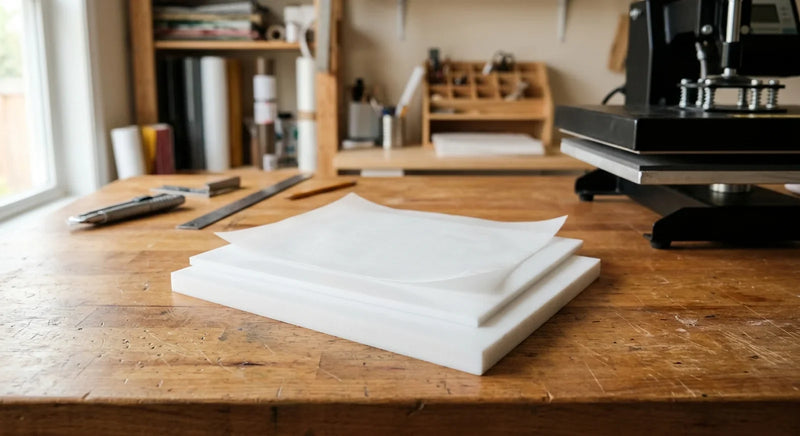
Why Is FEP Film the Release Layer That Changes Everything?
FEP (fluorinated ethylene propylene) film is what sits inside your mold before you pour resin. It prevents sticking and makes removal clean. This single material improves your results dramatically!

Without FEP film or a release agent, cured resin sticks to mold walls and demolds roughly. With it, your piece comes out smooth and pristine. FEP film is specifically designed not to stick to cured epoxy resin.
Some people use silicone spray as a release agent. This works but is messy and inconsistent. FEP film is cleaner and more reliable.
Cut FEP film to fit your molds or use strips for sides. It sits inside the mold before you pour. When cured, you simply peel away the film from your finished piece.
Pick up FEP and PTFE nonstick sheets for cleaner demolding.
Reusable FEP film lasts through many pours. It's durable. Once it gets wrinkled, torn, or sticky, replace it. But a single sheet might last 20-30 uses depending on your care.
Store FEP film flat. Wrinkles and folds transfer to your finished pieces. Keep it clean and dry.
What Mixing Tools and Techniques Actually Matter?
You need something to mix resin and hardener in. A disposable cup or container works fine. Plastic or glass, doesn't matter. You're throwing it away after one use anyway.
A stick or stirring tool is essential. Stir slowly to minimize air bubbles. Fast stirring traps air in your resin, creating bubbles in the finished piece.
A measuring system for your resin and hardener is crucial. Getting the ratio wrong means your resin won't cure properly or will cure strangely. A simple scale works, or measuring cups if the ratio is volumetric. Read your specific resin's instructions.
For pigments and mica powders, you need smaller tools. Stirring sticks, measuring spoons, or small scales depending on how precise you need to be.
Some people use a heat gun or torch to remove surface bubbles after pouring. This is optional but helpful. A butane lighter works in a pinch but a heat gun is safer.
A light box or curing box is helpful but not essential. It keeps dust out while your resin cures and provides a dedicated space for pieces.
Set up your workspace right with silicone mats and pads for spill-proof protection.
How Do You Keep Your Resin Workspace Safe?
Resin is not toxic but it does off-gas slightly. Work in a ventilated area or near an open window. You don't need a respirator for simple decorative resin work but good air circulation helps.

Protect your skin! Wear gloves, ideally nitrile. Resin can irritate skin, and once cured on your hands, it's hard to remove. Wash hands after removing gloves.
Eye protection matters. Resin splashes are rare but possible. Safety glasses are cheap and prevent problems.
Protect your work surface. Cured resin is permanent. Lay down a protective mat or use a dedicated surface. Silicone mats are great because resin doesn't stick and they're easy to clean.
If resin spills on fabric or unsealed wood, it sets permanently. Be careful. Work over a protected surface and keep resin away from clothes.
Heat is involved if you're using a heat gun. Keep it away from anything flammable and from skin.
Keep resin away from eyes. Wash thoroughly if exposure occurs. If ingested (which shouldn't happen), seek medical attention.
Store resin properly. Most epoxy is stable at room temperature. Keep it in a cool, dry place away from direct sunlight. Heat and light can degrade resin.
How Do You Set Up Your First Resin Project?
Start with small pieces. A simple pendant or small decoration, not a large jewelry box. Small projects teach you technique with less material wasted.
Get your FEP film in the mold first. Smooth out wrinkles so your finished piece is clean.
Mix a small batch of resin. Just enough for one pour. This teaches you proportions and behavior without committing to a large batch.
Stir slowly for 2-3 minutes. Thorough mixing is essential. You'll see the mixture change consistency slightly as hardener and resin fully incorporate.
Pour slowly into your mold. Fill completely but not to the very edge. Air bubbles will rise to the surface over the next few minutes.
Let it sit for 24 hours. Don't move it. Don't check on it constantly. Let chemistry happen.
After 24 hours, the resin should be hard. If it's still tacky, it's not fully cured yet. Wait longer or increase your working temperature slightly for the next batch.
Carefully peel away FEP film. Your piece should release cleanly. If it sticks, you either didn't use enough release agent or the mold isn't clean.
What Are the Most Common Resin Mistakes?
The biggest mistake is mixing without measuring. Ratios matter enormously. Off by 10 percent and your resin doesn't cure right. Invest two minutes in measuring properly.
The second mistake is mixing too fast. Fast mixing traps air. You'll have bubble-filled resin. Slow and steady wins.
Not using FEP film or proper release agents. Your pieces get damaged demolding. This ruins them and wastes materials.
Pouring over uncured resin. Some people think they can build layers by pouring more resin before the first layer cures. This doesn't work. Let each layer fully cure before adding another.
Not accounting for exothermic reactions. Resin heats up as it cures. In thick pours, heat can build and cause problems. Thinner pours in multiple layers are safer for beginners.
Working in cold temperatures. Most epoxy resin cures best between 70-80°F. Cold slows curing or stops it. Warm your workspace if needed.
Using ancient resin. Resin degrades over time. If your stock is over a year old and shows signs of separation or thick consistency, it's past its prime.
Shop Resin Craft Supplies
Starting your resin journey? Browse our resin and epoxy craft supplies for FEP film, silicone mats, and workspace protection. We also carry PTFE and FEP nonstick sheets for clean demolding every time.
Got More Resin Crafting Questions?
Q: Can I use regular mixing cups and sticks or do I need specialized tools? A: Regular disposable cups and sticks work fine. The only requirement is that they're disposable because resin is permanent once cured. Specialized resin supplies are nice but not necessary.
Q: How do I remove air bubbles from my poured resin? A: Let them rise naturally for the first 10 minutes. Most will pop on their own. If bubbles remain, a heat gun held several inches above the surface pops them. Don't overheat or you'll damage the resin.
Q: Why is my resin yellowing? A: Several reasons: old resin, poor storage, exposure to sunlight, or lower-quality resin. Always store resin in a cool, dark place. Better quality resin yellows less. Some yellowing is natural over years.
Q: Can I color resin with food coloring? A: No. Food coloring is water-based. Resin is not. It won't mix and will look weird. Use mica powders, resin-specific pigments, or oil-based dyes designed for resin.
Q: How thick can I pour resin without problems? A: Anything thicker than an inch or so can overheat during curing. Split thick pours into multiple layers, letting each fully cure before adding the next. This prevents cracks and uneven curing.
Q: Can I reuse silicone molds or do I need new ones each time? A: Silicone molds are reusable hundreds of times if you care for them. Clean them after each use and store them properly. They eventually deteriorate but you get many uses before replacement.
Related Reading: